First sculpt
So im completely new to sculpting and as such i figured it'd be a good idea to share my journey trying to teach myself with any who may be reading. My first attempt is (hopefully) going to be based on a pose of Crixus (from the Spartacus TV series)

So it's my first time even using "green stuff" Kneadatite but while i know it's not perfect by a long way, im fairly happy with my first attempt at the pose. Seems that the files i have see to be having a tough time filing the kneadatite away so i need to invest in some new ones. Here is a picture of the progress so far though :

More to follow as soon as my new files arrive hopefully. Im not happy with the face either but as a first attempt i can't grumble! I learned alot from this too. I'll add a bullet point list of my findings at the close of this first project.
Space1999 Eagle Fabrication
A small fabrication project for my dad, he's taking an old Dinky toy of the Eagle and adapting it to have the freighter pod on it's underside.

The freighter pod he wants to fabricate:

So first things first he needs to two scaffold style arms that the base of the cradle is fixed to. So using paperclips and greenstuff i got to work. Im really pleased with the end result. It's not cleaned up yet but still im impressed. It worked out better than i thought it would considering i was only using materials i had on hand.
The Dragonborn Sculpt
So after loosing my initial greenstuff sculpt I decided it'd be a wise idea to start over. I'd learned things from the first sculpt unfinished though it was that I could apply to this next project... A dragonborn assassin for a dnd friend...
So as these things usually start i pulled up google and searched for dragonborn, then did searches for variations e.g dragonborn rogue etc etc. Eventually i found a picture i liked and reminded me of the char i was trying to recreate :
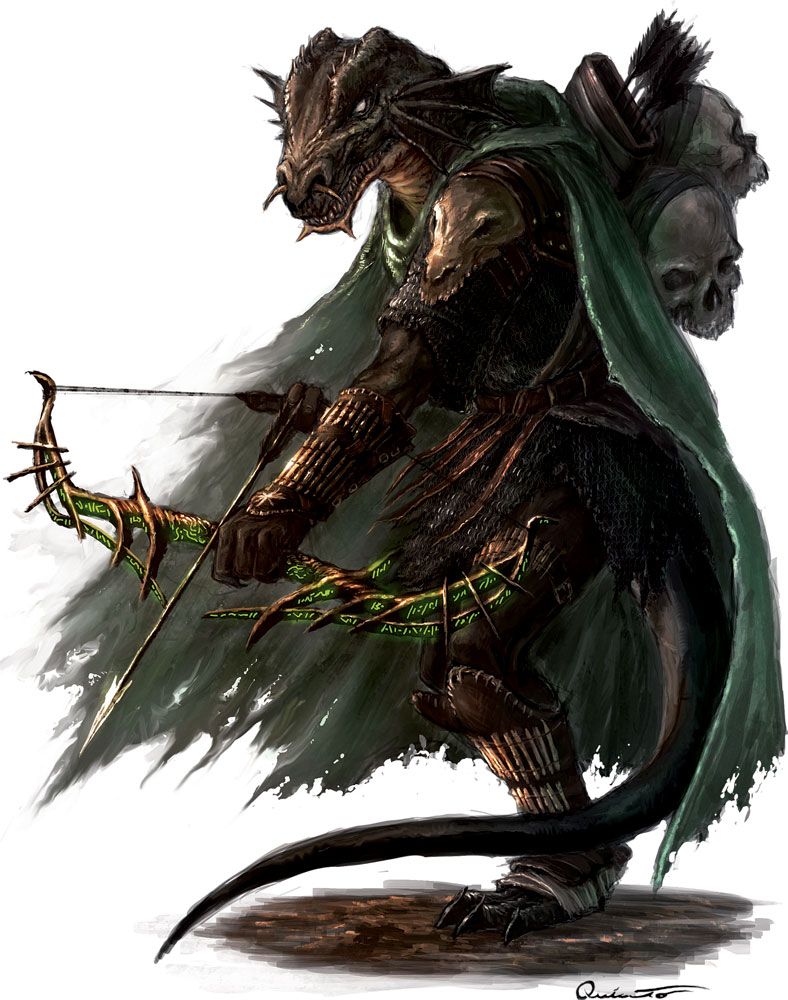
Now dragonborn in dnd don't have tails...much to my disappointment. But it did provide me with some insight as to facial features etc. Next up while my friends char does use a bow he usually uses a shortsword and dagger, and comes across as more of an assassin type. So I got to work with some paperclips and created a sort of crouching position, and broke out the greenstuff...

Above is the first layer of greenstuff. Just fleshing out the legs a little and played around with a clawed foot.


 So after allowing the above to set overnight i continued this morning with another layer of greenstuff, added a foot to the other leg (which im not happy with) I then found an old torso from some old pieces of warhammer i had laying around in my old...old...old bits case, which i used to help flesh out the torso of the dragonborn as a sort of building block and just to save on some greenstuff. I then set it into a ball of greenstuff which i'd set on top of the legs and used what little i had left to try and mold it into the body shape i was going for. Then since i had a small amount still left i rolled it out flat and used the grip of one of my sculpting tools to create a sort of armoured effect which i then stuck over the torso...again not overly pleased with its fit or sizing but im pleased with the effect. Turns out water is a sculpters best friend. I splashed water on my work surface so the green stuff wouldnt stick to it and then soaked the handle of my tool....as is the way it wasn't enough and the greenstuff stuck to the handle, but with some gentle coaxing from a wet craft knife it came free and i swiftly placed it into position....which has since slipped. Below are a few pictures of the second phase results.
 So the third round didn't go so well in my opinion. Mostly i did what i presume is a fatal error and one often done i suspect. I decided i should make a start on the head and naturally went too far, trying to do too much in one go. In hindsight i should have gone smaller, and layered on the different details. I fleshed out one of the legs some more though and stuck a "blob" of greenstuff at the neckline to fix the head to. Hopefully once this has set i can rescue the mess of the head and work in a few extra layers for details. We'll see.
No comments:
Post a Comment